SoftProdigy Online Store


Trinket - Magento Jewelry Theme
Item Id: 218
Give your jewelry store a clean and professional look with the Trinket Magento Jewelry Theme. This theme is user-friendly, easy to install, and compatible with all Magento versions. It’s a fully customizable solution to provide store owners with a modern, clean, and professional design for selling pieces of jewelry and accessories online.
Professionally developed by an experienced team of developers and designers at SoftProdigy, Trinket supports lots of useful features that will give your jewelry store a new look and help you attract and retain more customers online. It’s a creative approach to design an online jewelry store and bring your vision to reality.
It’s no surprise why so many businesses are looking for ways to launch or update their online jewelry store, especially when 46% of consumers buy from small businesses mostly, than larger businesses. So, if you’re ready to tap into this growing industry, you’ve come to the right place!
Whether you are selling some pretty trinkets or a handful of precious stones, the Trinket Magento Jewelry Theme will help you get started and make a tidy profit at the same time. This theme is specially designed for online jewelry stores that want to offer more features like page builder, megamenu, and shop by brands. It is a professionally built and responsive Magento theme that comes with some amazing layouts and handy customization options.
The theme helps you provide a smooth online shopping experience to your visitors, allowing you to insert content with images, texts, and videos. You can also add a popup with a block subscription to the newsletter. Other item details include:
- 100% Responsive Design: Trinket is fully responsive on any kind of device, be it desktop or mobile. This theme is designed with mobile-first UX design in mind.
- Magento Compatibility: Trinket arrived with Magento compatibility. This simply means that all extensions that come with this theme are fully compatible with Magento without affecting Magento core files.
- Unlimited Color Options: You can choose from unlimited color options for your jewelry store customization. You can choose them from the backend panel.
- Browser Compatibility: The theme works perfectly with all popular browsers, such as Mozilla Firefox, Google Chrome, Opera, and Safari.
- Responsive Banner Slider :Trinket comes with a responsive banner slider that attracts online users to your store.
- Advanced Newsletter Popup: Trinket comes with a responsive banner slider that attracts online users to your store.
- Megamenu: This option provides responsive menus with new and hot labels, displaying categories within categories. This allows you to organize your categories and sub-categories easily.
- Multi-language and Currency: Customize your jewelry store to speak your business language and choose from multiple currencies based on where your shoppers are.
- Shop by Category: This section enables you to organize the jewelry items in your shop by category. The theme is designed to make it quicker to browse through all the product categories that your online jewelry store has to offer.
- Social Media Widget: Trinket offers some great social media widgets that require on every website like Instagram and Facebook. It keeps your customers aware of the new products in your store.
It is easier than ever for jewelry merchants to improve their website by equipping it with the Trinket Magento Jewelry Theme. Time to add a simple yet elegant touch to your online jewelry shop. Grab this opportunity now!
Theme package is used for build a real ecommerce website.
In case you’ve already got a Magento website and you want install our theme into your website, you can use theme package.
If you haven't a Magento website, you need to install a freshed Magento before install this package.
There are three main steps to install it:
- Unzip theme package
- Installing dependent modules.
1. UNZIP THEME PACKAGE
Go to your Magento installtion folder. Copy and paste the pakage watch-theme.zip to this folder. Then unzip it. 
2. INSTALLING DEPENDENT MODULES
Use SSH, go to Magento root directory.
Run commands:
- php bin/magento c:f
- php bin/magento setup:upgrade
- php bin/magento setup:di:compile
- php bin/magento indexer:reindex
3. ACTIVATE YOUR FAVOURITE THEME
Access to admin panel, and go menu Softprodigy> Flexible Theme > Settings.
The infinitd theme list is displayed on this page. You only need to hover on your favorite theme and click on button Activate, the referent theme will be enabled.
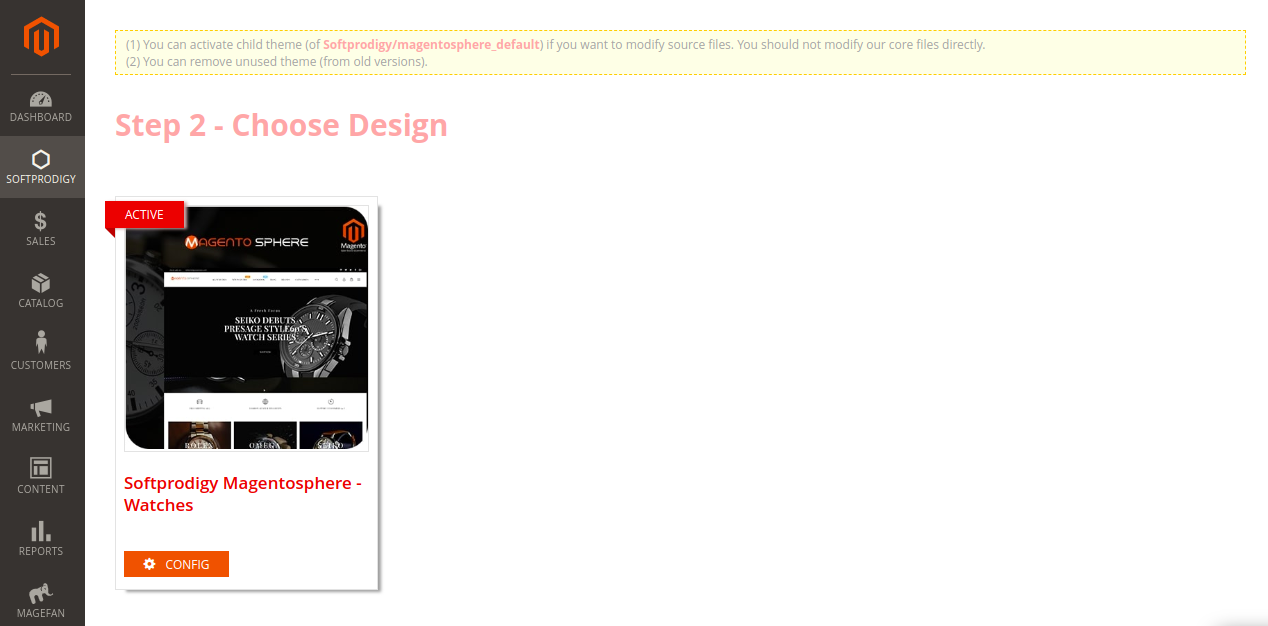
Refresh Magento cache and back to home page, the theme was installed successfully!
MagentoSphere theme provides header styles.
To select header
- Go to menu Softprodigy > Flexible Theme > Settings.
- In theme list page, hover on your current theme, click button Config.
- In theme settings page, go to tab General > Header. Choose your favorite header for Select Header field. Click button Save Config.
To edit header:
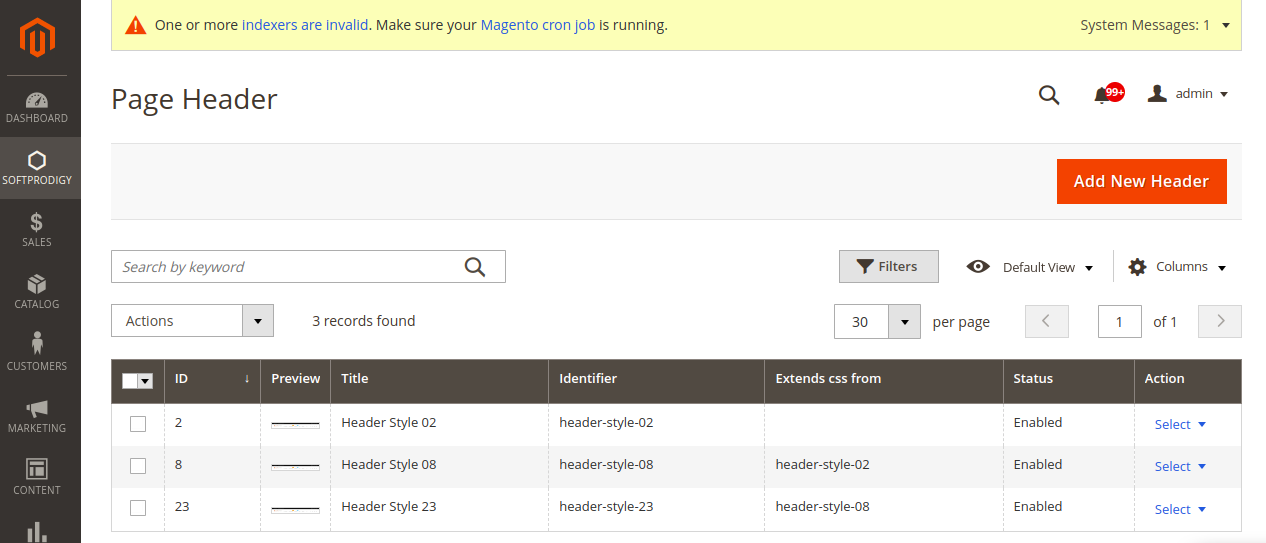
- Go to menu Softprodigy > Flexible Theme > Header.
- In header list, select the header you want to modify and click to edit.
- In Header settings page, there are 4 sections:

| 1) General | |
| Header Identifier |
This is the unique identifier of header. |
| Header Title | The name of header |
| Extends CSS from | If you want to get the design of another header and only need to change colors, you can extend the CSS style of parent header with this field. |
| Enable | Enable or disable the header. |
| 2) Font/Color Variables | |
| You can change header colors, backgrounds with fileds in this section | |
| 3) Layout Structure | |
|
The layout XML of header. |
|
| 4) Extra Content | |
|
Some header will use extra text for its content (link list, telephone, image…). |
|
Our theme supports 13 footer styles (and update more in next theme versions).
To switch footer:
- Go to menu Softprodigy > Flexible Theme > Settings.
- In theme list page, hover on your current theme, click button Config.
- In theme settings page, go to tab General > Footer. Choose your favorite footer for Select Footer field. Click button Save Config.
To edit footer:
- Go to menu Softprodigy > Flexible Theme > Footer.
- In footer list, select the footer you want to modify and click to edit
- In Footer settings page, there are 4 sections:


| 1) General | |
| Footer Identifier |
This is the unique identifier of footer. |
| Footer Title | The name of footer |
| Extends CSS from | If you want to get the design of another footer and only need to change colors, you can extend the CSS style of parent footer with this field. |
| Enable | Enable or disable the footer. |
| 2) Font/Color Variables | |
| You can change footer colors, backgrounds with fileds in this section | |
| 3) Layout Structure | |
|
The layout XML of footer. |
|
| 4) Content | |
|
The content of footer. You can edit links, images,… of footer with this field. |
|
We use page builder to generate content of home page.There are available 10 designs for home page. You can choose one and adjust it (add new element, remove element, change text, change layout, change colors,…) to get your wish design.
To switch home page design:
- Go to menuSoftprodigy > Flexible Theme > Settings.
- In theme list page, hover on your current theme, click button Config.
- In theme settings page, go to tab General > Main Content. Choose your favorite footer for Select Main Content field. Click button Save Config.
To edit home page:
- Go to menu Softprodigy > Flexible Theme > Main Content.
- In Main Content list, select the item you want to modify and click to edit
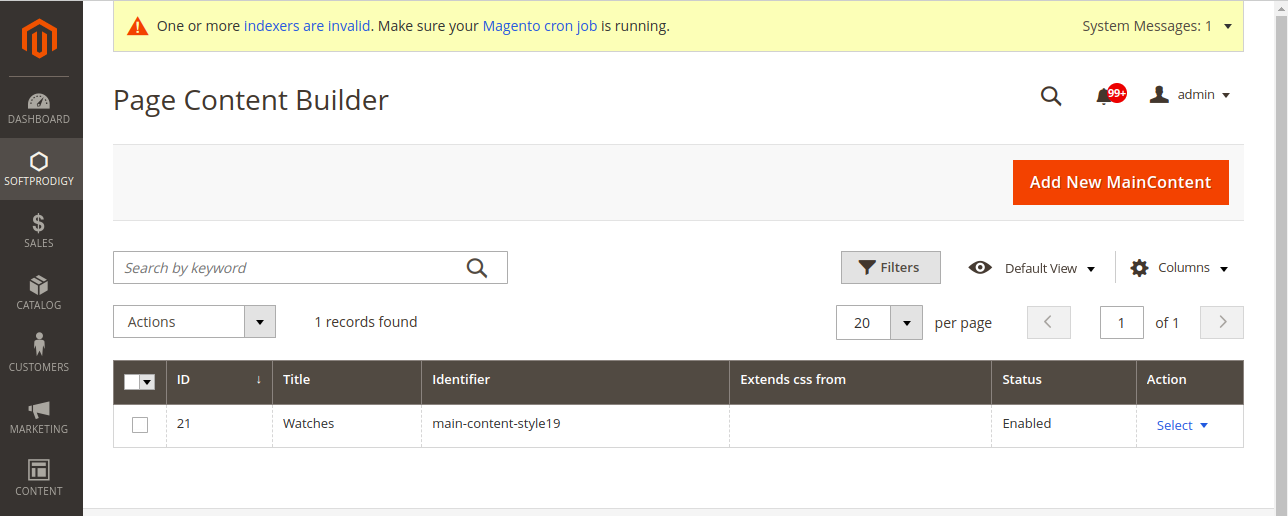
- In Main Content settings page, there are 3 sections:

| 1) General | |
| MainContent Identifier |
This is the unique identifier of content builder. |
| Main Content Title | The name of this layout. |
| Enable | Enable or disable the content builder. |
| 2) Font/Color Variables | |
| You can change main content colors, fonts, backgrounds,… with fileds in this section. | |
| 3) Main Content Builder | |
|
The content builder. You can generate your home page content by drag-drop tool: adding, remove, edit, config elements. For more details, please check Feature tab->Page Builder Feature. |
Refer FAQ tab |
To config options of theme, go to menu: Softprodigy > Flexible Theme > Settings.
On the theme list, hover on the theme are using and click button Config.
Please refer to FAQ tab.
Please refer to FAQ tab.
1. CHANGE CATEGORY PAGE STYLE
- Go to menu Softprodigy > Flexible Theme > Settings.
- Hover on your current theme and click button Config.
- In theme settings page, go to section Pages > Category View > Product Listing Design. Change the category style with the field Product Listing Style.
2. CHANGE PRODUCT PAGE STYLE
- Go to menu Softprodigy > Flexible Theme > Settings.
- Hover on your current theme and click button Config
- n theme settings page, go to section Pages > Product View. Change the category style with the field Layout Type.

CONTACT PAGE SETTINGS
Go to menu Softprodigy> Flexible Theme > Settings.
Select your current theme.
Configure Google Map in section Pages > Contact.
Please refer to FAQ tab.
1. FLEXIBLE BLOCK WIDGET (INSERT PAGE BUILDER ANYWHERE)
Firstly, you can use page builder as a CMS Block.
1.1. Create new page builder
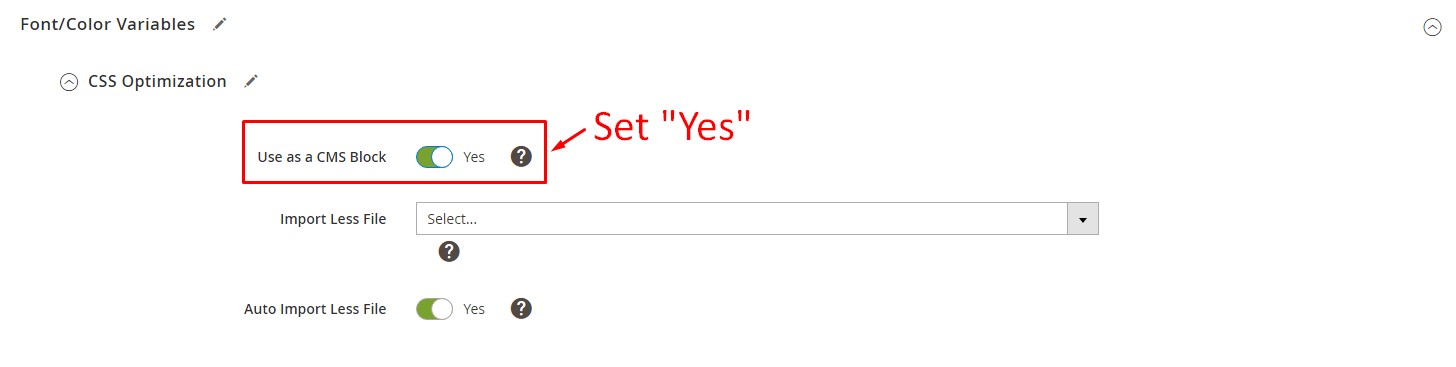
- Go to menu Softprodigy > Flexible Theme > Main Content. Create a new main content.
- Edit your new main content. NOTICE: Set "Yes" for field Font/Color Variables > CSS Optimization > Use as a CMS Block. This makes the main content's CSS file optimized, your page can be loaded faster.
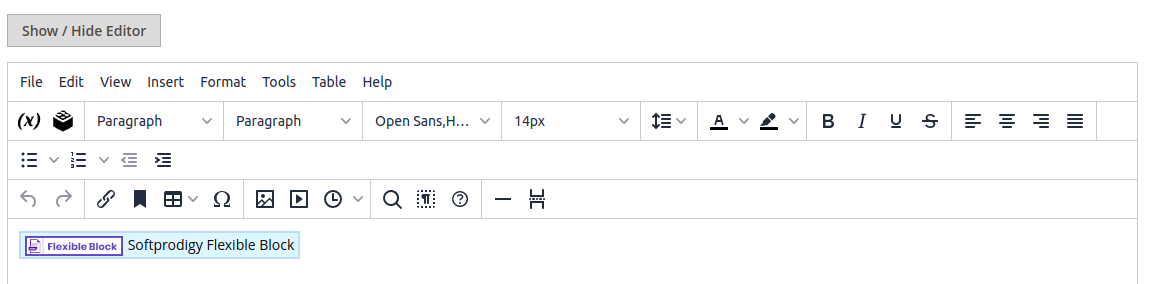
1.2. Insert page builder as a widget
Our theme supports Softprodigy Flexible Block widget. You can insert this widget into anywhere by using one of default elements of Magento below:
- CMS Page: menu Content > Elements > Pages
- CMS Block: menu Content > Elements > Blocks
- CMS Widget Instance: menu Content > Elements > Widgets
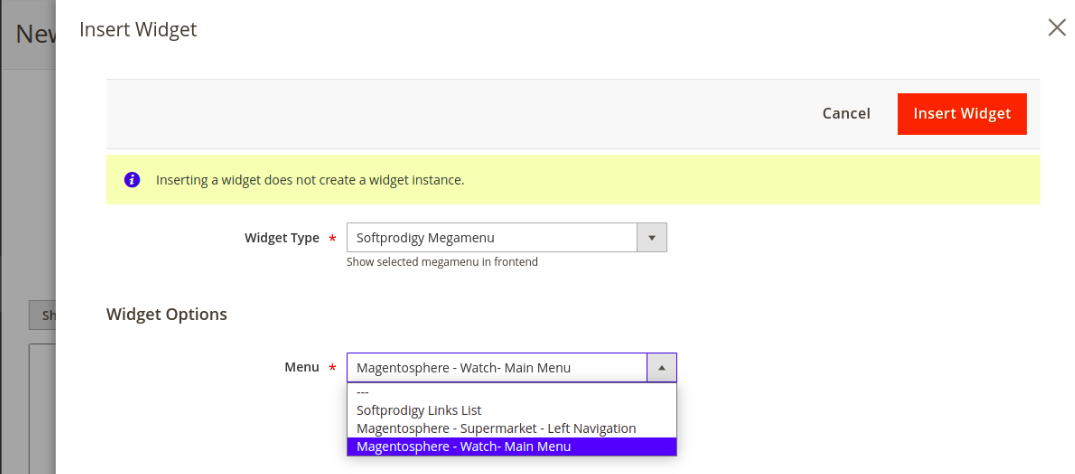
Insert new widget

1. FLEXIBLE BLOCK WIDGET (INSERT PAGE BUILDER ANYWHERE)
Go to menu Softprodigy > Flexible Theme > Settings. On the theme list, hover on your current theme and click button Config. In theme settings page, go to tab General, group Header and choose main menu in the field Select Main Menu.
2. ADD A EXISTED MENU TO FRONT PAGE
Go to menu You can use Magento widget to add a exist menu to any position and any page you want.
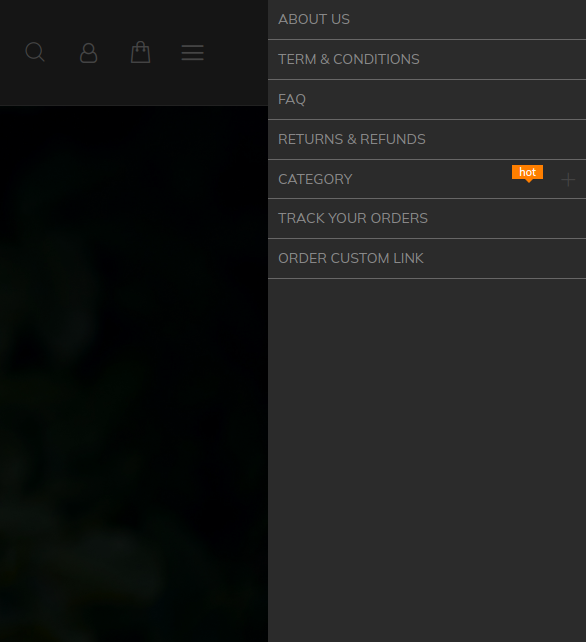
3. CREATE NEW MEGA MENU
To create a new mega meu, go to Back office menu Softprodigy > Megamenu Drag & Drop > Manage Megamenu. Click button Add new menu.
3.1 SETTINGS
| Settings | |
| Title |
The title of menu, using for managing menus in menus list. |
| Identifier | The identifier of menu, using for selecting which menu will show in frontend. Therefore, each menu must have a unique identifier. |
| Menu type |
There are two options:
|
| Wrapper CSS Class | The CSS class of menu HTML wrap element. |
| Dropdown Style |
There are two options:
|
| Dropdown Animation |
The animation of dropdown menu after hovering the mouse on menu. There are four options:
|
| Enabled | If set No, the menu will not be displayed in front page. |
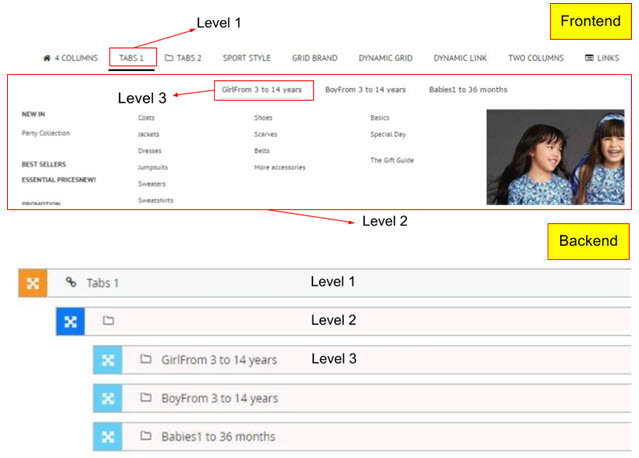
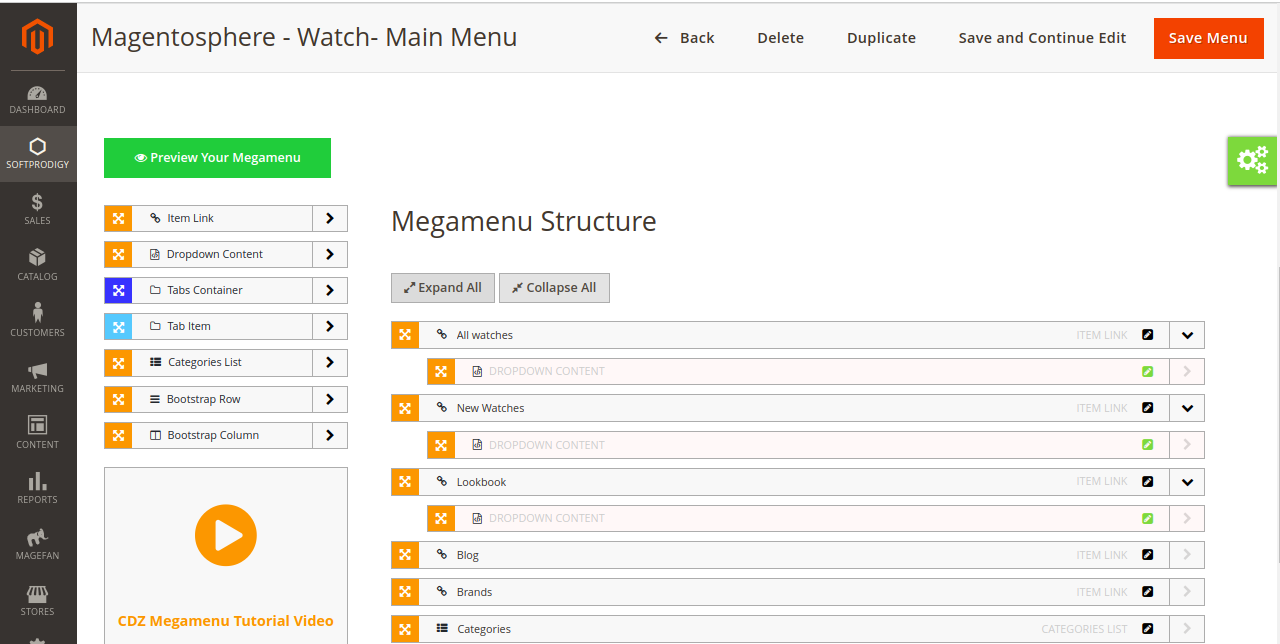
3.2 MENU BUILDER
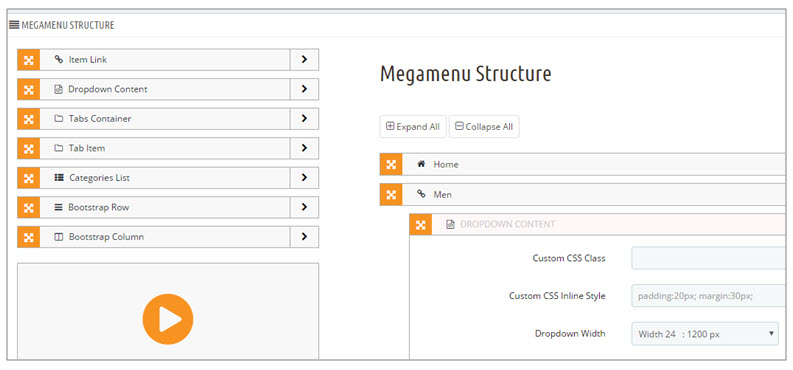
MENU LEVEL
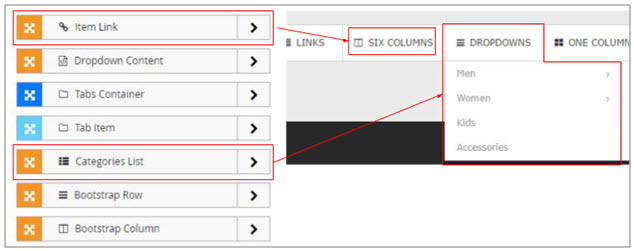
DRAG AND DROP ITEMS TO MENU
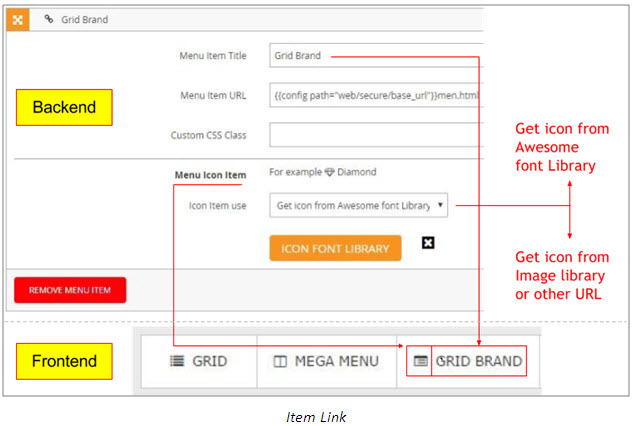
| Item Link |
Add a single hyperlink to menu. Options:
|
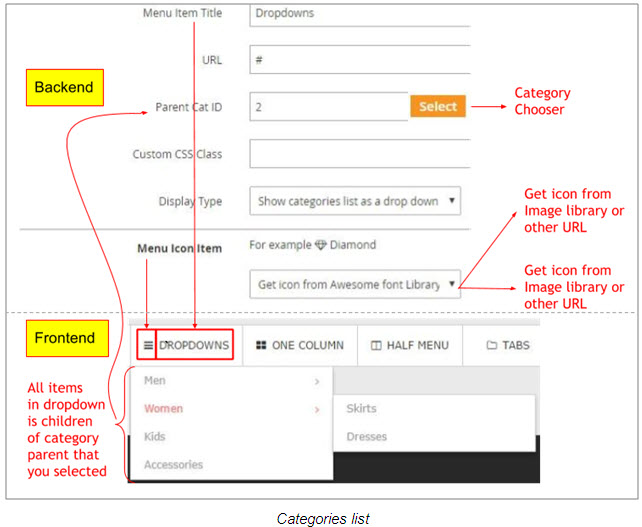
| Categories List | Add a categories list to menu |
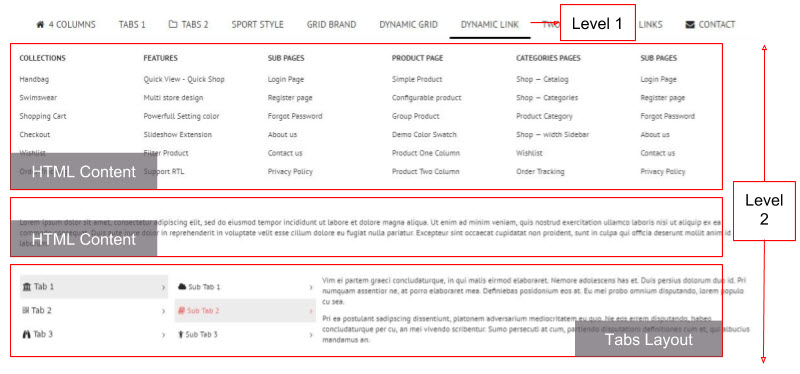
Level 2 is the dropdown menu of a level 1 item. For this item level, there are 5 types that you can use:
| Item Link | The dropdown is a group of single links. |
| Categories List | The dropdown is a list of categories. |
| HTML Content | The dropdown is a custom html content. If use this type, you can add your favourite html, select layout |
| Tabs | The dropdown is a tabs layout. |
| Bootstrap 24-Columns | If you have knowledge about Boostrap CSS, you can use this type to build your favourite dropdown content. Our module supports Boostrap 12-Columns. This type will help you build a complex layout for dropdown menu. If the dropdown layout is not very complex, you should use HTML Content instead. |
Moreover, you can also use a combination of types above to set up a level 2 dropdown. For example:
3.3 HTML CONTENT FOR MENU
DRAG AND DROP HTML CONTENT TO MENU
SETTINGS
| Custom CSS Class | The custom CSS class for dropdown HTML element in DOM. |
| Custom CSS Inline Style | The custom CSS inline style for dropdown HTML element in DOM. For example: padding-bottom: 50px. |
| Dropdown Width | The width of dropdown content (calculated by pixel). |
| Dropdown Content | The layout and HTML content of dropdown. |
| Background for content | The background image of dropdown content. |
EDIT TOOL
You can edit the HTML content with our edit tool.
| Help you edit the dropdown content with WYSIWYG Editor. | |
| Help you to insert widget (See more in II. ADD WIDGET TO YOUR CONTENT). | |
| Insert available HTML template to your text. Base on those templates, you can modify them to make your favourite dropdown content. |
3.4 TAB FOR MENU
DRAG AND DROP TABS TO MENU
To set up a tabs, you have to use a tabs container and some of tab items.
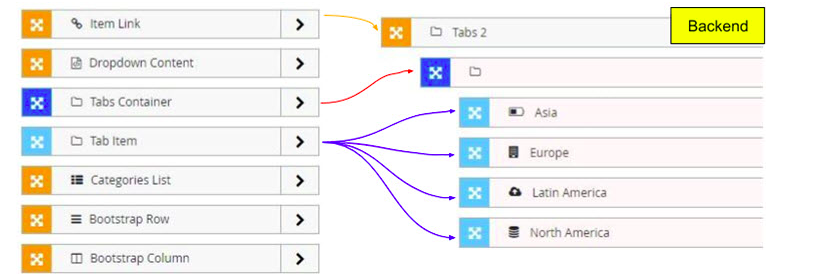
TAB CONTAINER
| Custom CSS Class | The custom CSS class for tab container HTML element in DOM. |
| Custom CSS Inline Style | The custom CSS inline style for tab container HTML element in DOM. For example: padding-bottom: 50px. |
| Tab Width | The width of tab container. |
| Tab type | Horizontal or Vertical (view image below). |
| Background for content | The background image of tab container. See more in II.3.D Background image |
TAB ITEMS
| Tab Title | The title of tab item link. |
| Tab URL | Redirect link when clicking on tab item link. |
| Custom CSS Class | The custom CSS class for tab item panel in DOM. |
| Tab Content | The layout and HTML content of tab item panel. This setting is similar to setting of Dropdown Content. See more in II.3 HTML Content for menu |
| Background for content | The background image of tab item panel. See more in II.3.D Background image. |
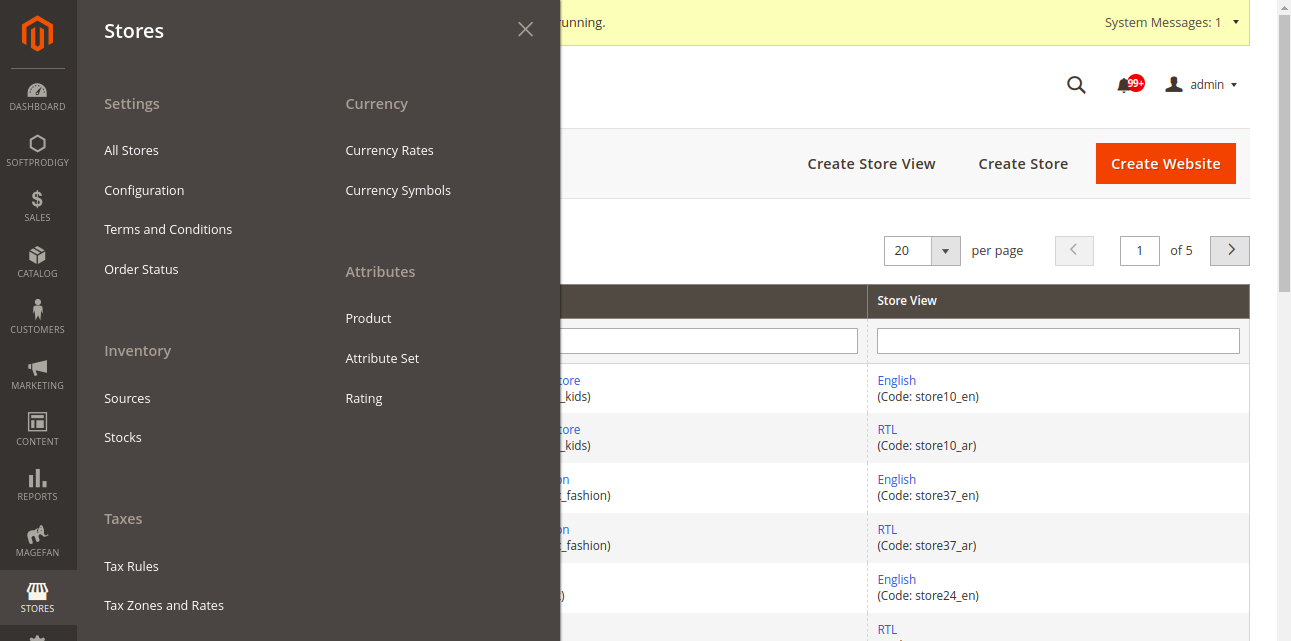
1. ASSIGN BRAND ATTRIBUTE
Go to menu Stores > Attributes > Product.
Create an attribute:
- Catalog Input Type for Store Owner = Dropdown.
- Use in Layered Navigation = Filterable (with results) or Filterable (no results).
This attribute will be used as a brand group. All its option values are used as brands. You can use an existed attribute like Manufacturer.
Remember to add this attribute to product Attribute Set (Go to menu Stores > Attributes > Attribute Se). From now, every time you create a new product, you can choose brand for it through this attribute. Moreover, when you import products by import tool, you can import values for this attribute.
Go to menu Softprodigy > Shop by brand > Brand Settings. Select Attribute Used as Brand.
In this section, you can also set value for other configurations relating to brand page, brand block.
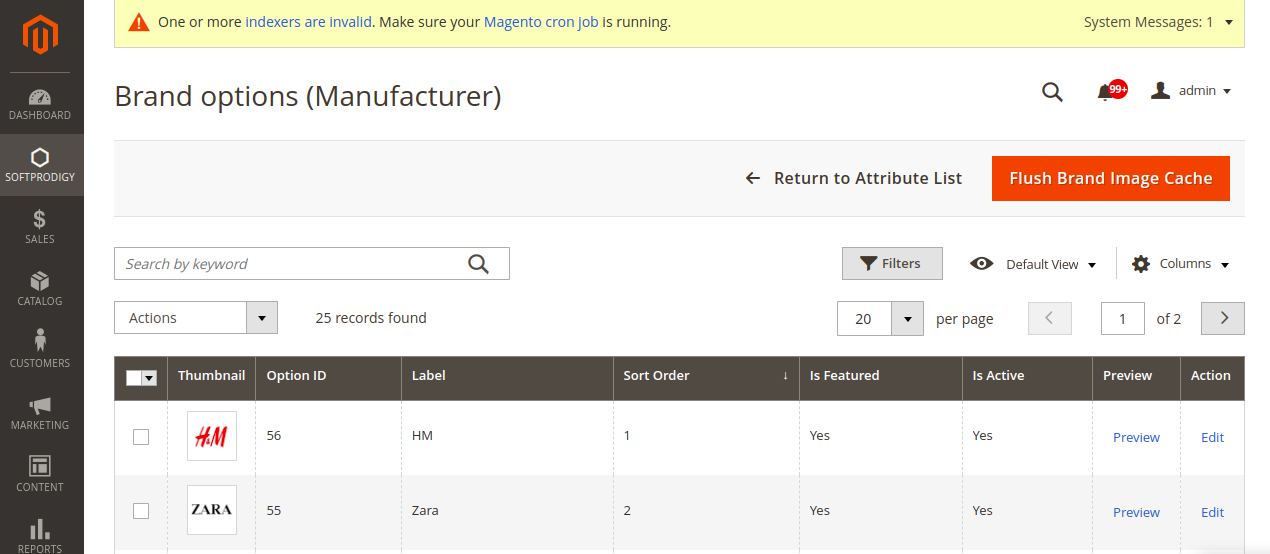
2. ADD BRAND LOGO/BANNER/DESCRIPTION/SEO… SET FEATURED BRAND
Go to menu Softprodigy > Shop by brand > Manage Brands.
STEP 1: CREATE LOOK
Go to menu Softprodigy > Lookbook Pro > Lookbook Item. Click button Add New Item.
In edit page, enter the look name. In Photo Config section:
- Click on 'Insert/Change image' button to insert a lookbook image.
- Click on 'Insert product point' button to insert a new product point. Drag the point to a wanted position on lookbook image. You can add more than one product point.
- With each product point, click on (+) button to assign a product to the point and click on (x) button to remove the point.
STEP 2: CREATE LOOKBOOK AND ASSIGN LOOKS TO LOOKBOOK
Go to menu Softprodigy > Lookbook Pro > Lookbook
STEP 3: CREATE LOOKBOOK CATEGORY AND ASSIGN LOOKBOOK TO CATEGORY
Go to menu Softprodigy > Lookbook Pro > Lookbook Category
Step 4: More settings
Go to menu Softprodigy > Lookbook Pro > Settings
The Product Filter Widget for Magento 2 allows you to easily show product listings on any page in your store filtered by category and any product attribute. You can use it to create products list on homepage.
| Option | Description |
| Display Type |
Type of products are filtered.
|
| Number of Products to Display | (number) Limit the number of products to show. |
| Order by | Used to sort the data in ascending or descending order |
| Show on frontend | Choose which elements are visible on product list. You can select multiple elements by holding Ctrl and clicking |
| Thumbnail Width | The product thumbnail width (in pixels). |
| Thumbnail Height | The product thumbnail height (in pixels). |
| Template | Choose a template to display products list. |
| Custom template |
This option is displayed once you select Custom template for Template field. E.g., If you input: grid-style-01.phtml. The full path of this template will be: app/design/frontend/Softprodigy/magentosphere/default/Softprodigy_ProductFilter/grid-style-01.phtml |
| Conditions | You can make a rule for filtering products. E.g, with the rule “Category is 120, 125, 137, 325”, all productsbelong to categories withid 120 or 125 or 137 or 325 will be displayed on your product list. |
| Cache Lifetime (Seconds) | Expiration time in seconds that this product list show be cached. |
1. ADD A NEW SLIDESHOW
1.1. Create new element
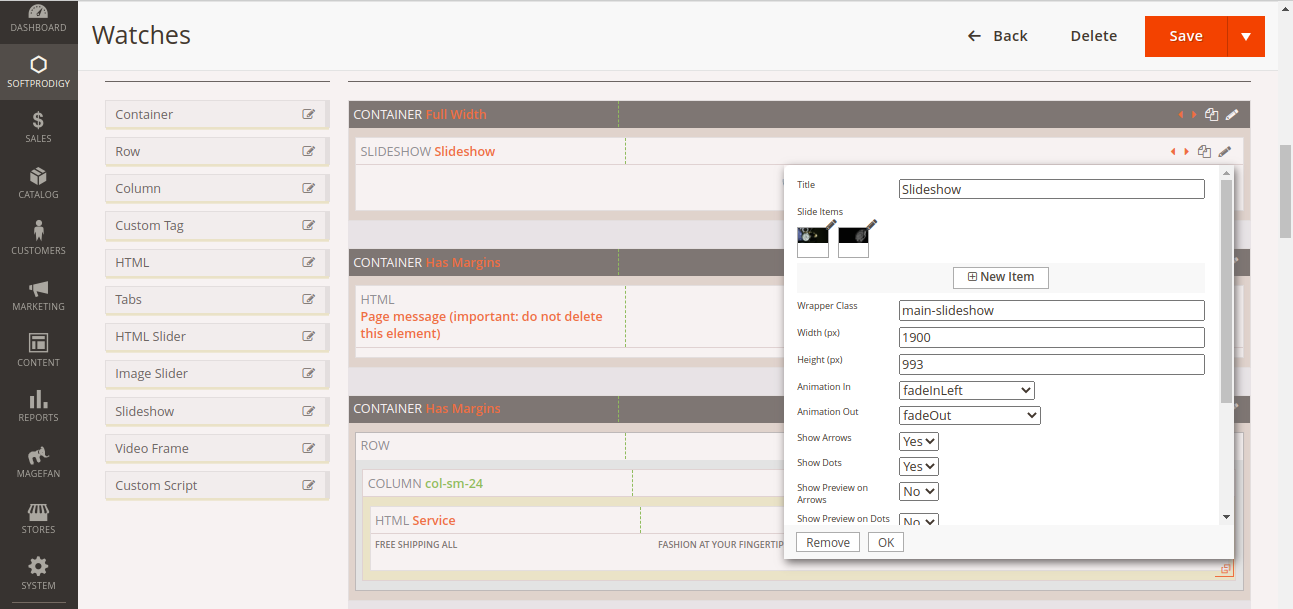
1.2. Edit slideshow
Click pencil icon to edit slideshow.
Slideshow settings:
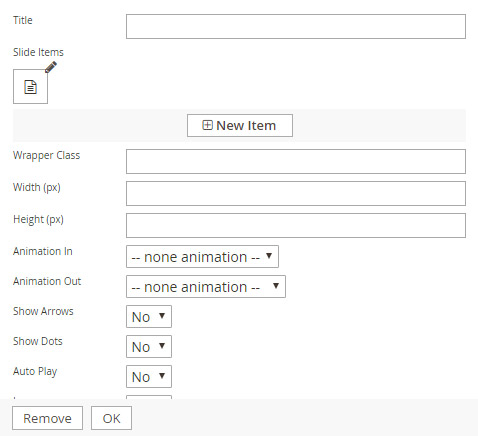
- Title: The title of slideshow. It is only used in backend to define the slideshow quickly.
- Slide items: Add slide images and captions. Click "(+) New item" to add more item.
- Wrapper Class: To add special class for your customization.
- Width (px): The slideshow width.
- Height (px): The slideshow height.
- Animation In: The appearance effect of the slides.
- Animation Out: The disappearing effect of the slides.
- Show Arrows: Show the Next/Previous buttons.
- Show Dots: Show slides pager.
- Auto Play: To set automatically change to the next image.
- Loop: Repeat image movement.
- Autoplay Timeout: Time go to the next image.
2. SLIDE CONTENT
Click pencil icon at Slide items section to add slide image and caption.


We have some classes to set the caption animation.
- text-left, text-right, text-center
- slide-top-left, slide-top-right, slide-top-center
- slide-bottom-left, slide-bottom-right
- slide-middle
You can add/change these classes to adjust the caption position.
3. SLIDE CAPTION ANIMATION
For caption animation, now we only use the slide-down effect.
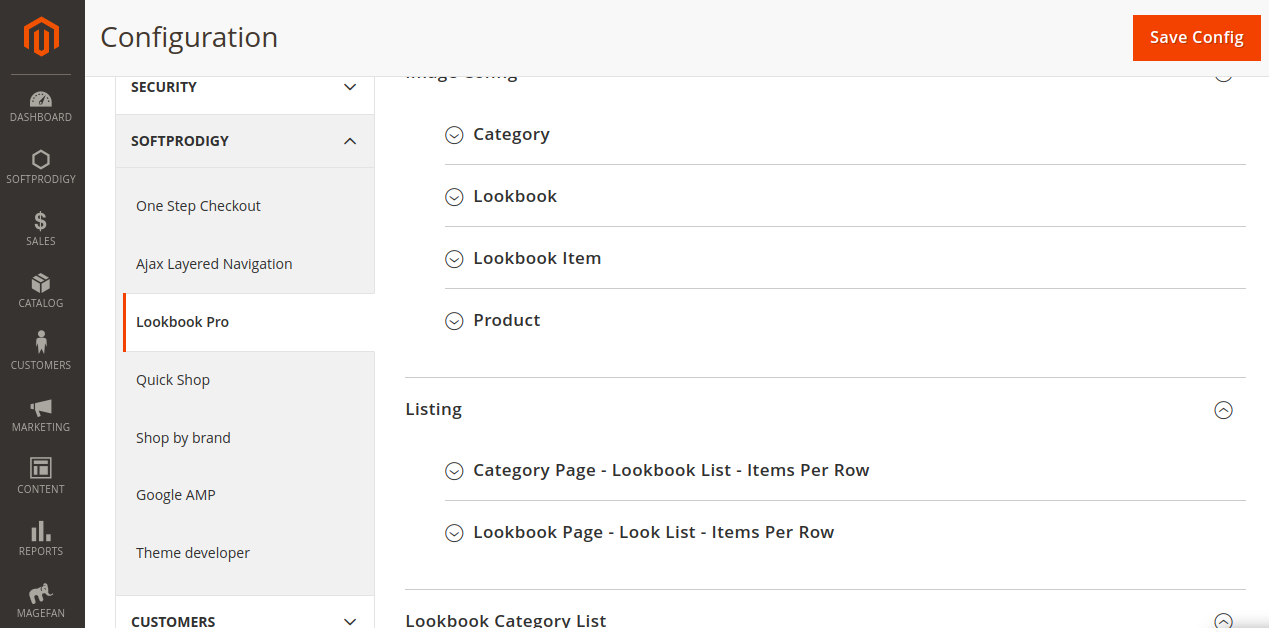
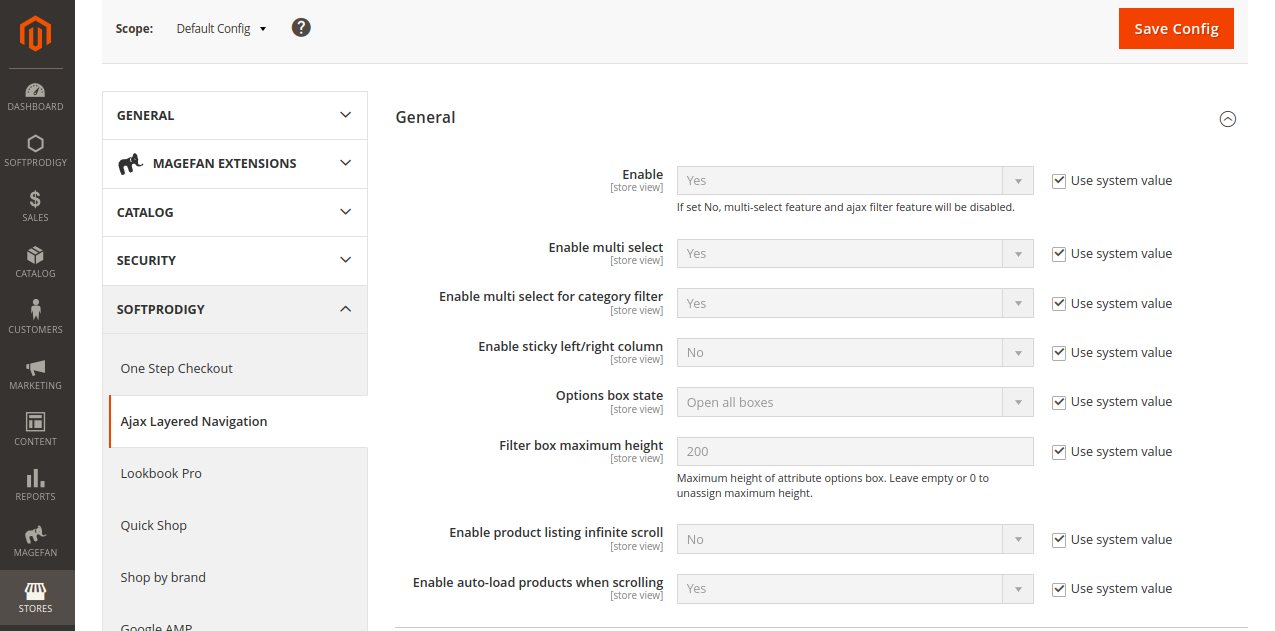
1. GLOBAL SETTINGS
Go to menu Stores > Settings > Configuration.
Go to tab Softprodigy > Ajax Layer Navigation.
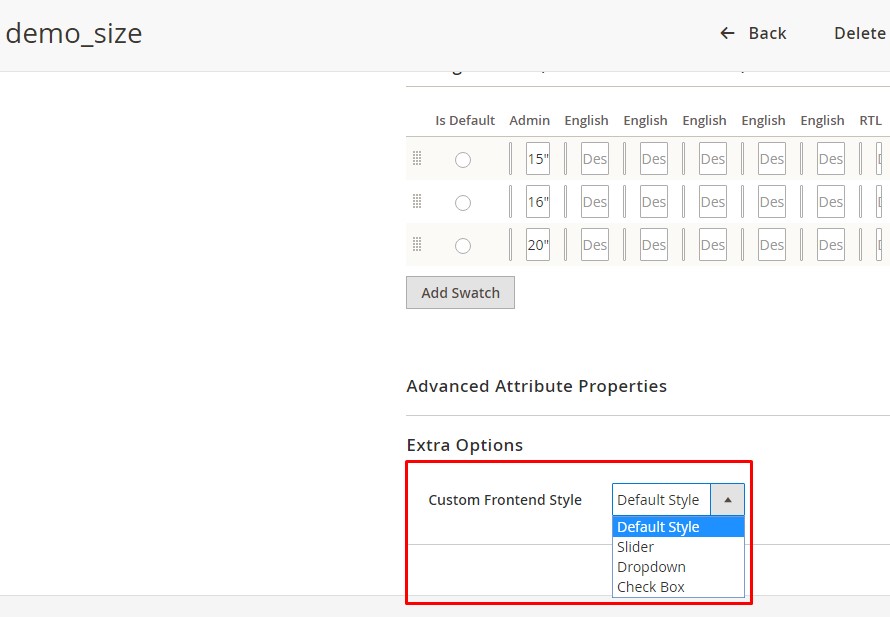
2. DEFINE DISPLAYING STYLE IN CATEGORY PAGE (CHECKBOX, SLIDER, DROP, LINK, ...)
With each attribute, you can define the displaying style for attribute options in category page (checkbox, slider, drop, link, ...) by following:
- Go to menu Stores > Attributes > Product
- Select the attribute that you want to change displaying style.
-
Change the style in the field Properties > Extra Options > Custom Frontend Style. Click button Save and clear Magento cache.
The Labels extension for Magento 2 help you to create multiple labels on product item. Moreover, you can manage Labels items in admin panel, create a rule to display labels on product which matches your rule.
To manage Labels, in admin panel, navigate to Softprodigy > Product Label > Manage Labels
In this section, we guide about the options of a Labels in details
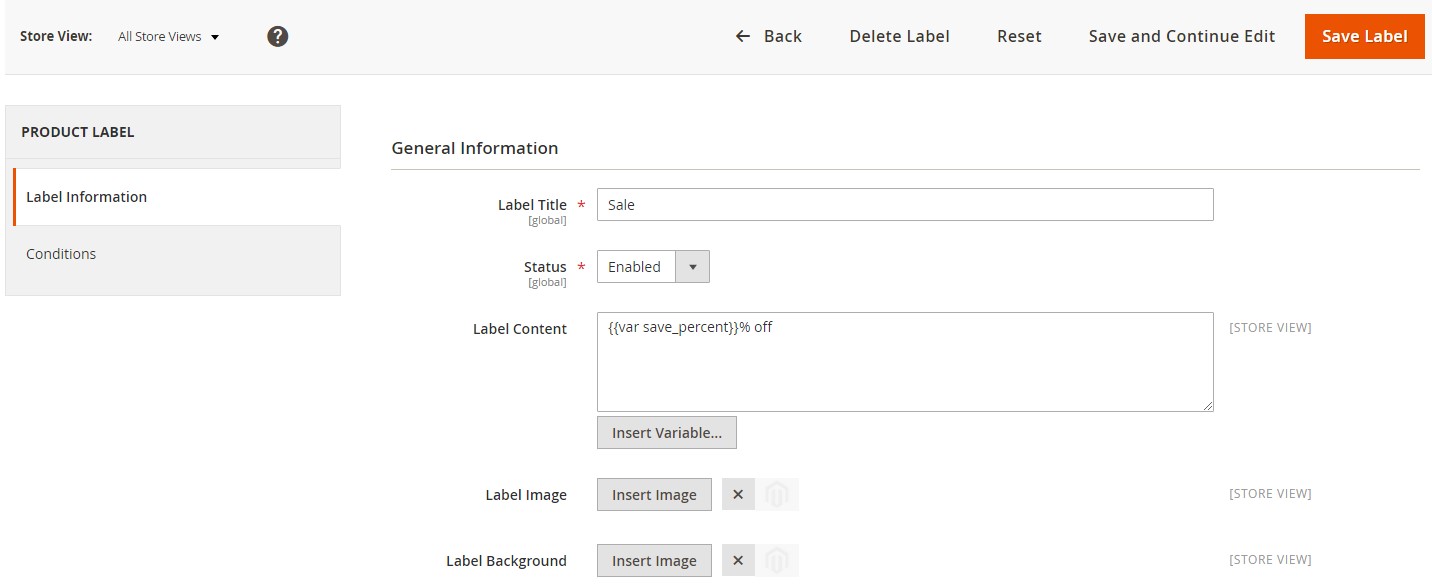
LABEL INFORMATION
| Option | Description |
|---|---|
Label Title |
The name of label Options: string |
Status |
Whether this label is enable or not Default: Enable Option: Enable, Disable |
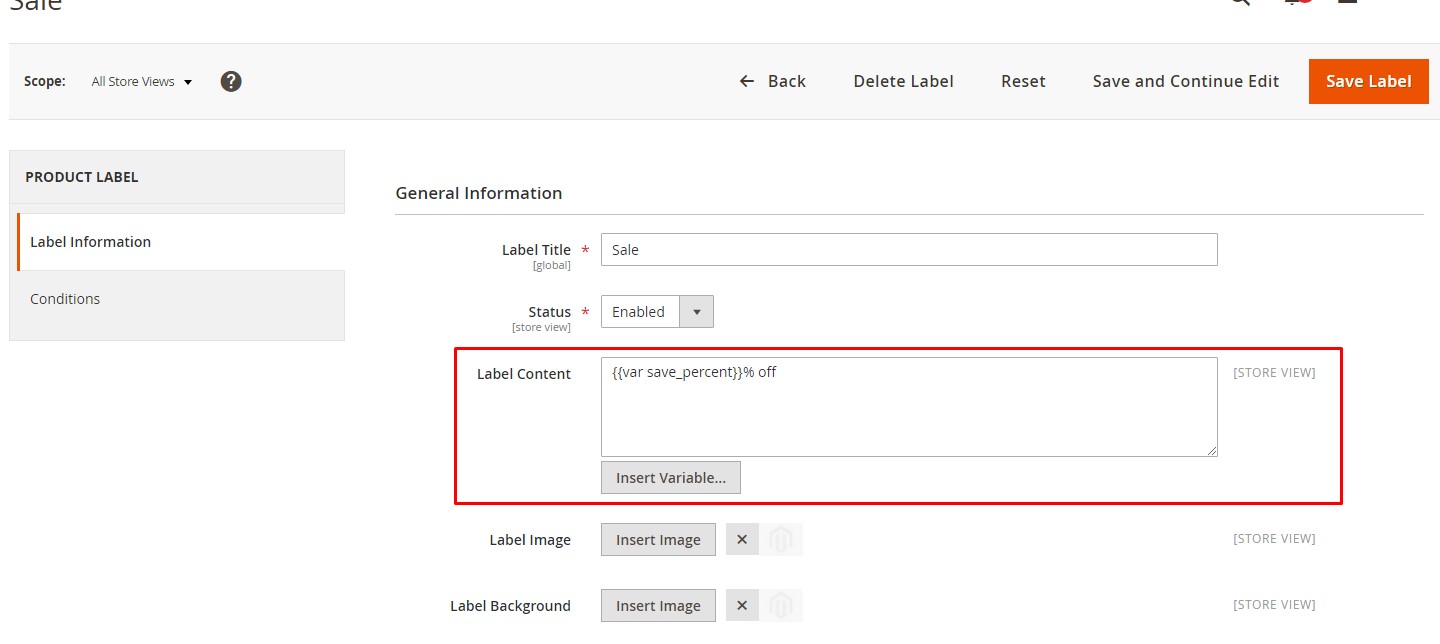
Label Content |
You can input any text on the label, for instance, new, hot. If your label is
Sale, you can input the percentage of price off by clicking on Insert
Variables at the below, and choose Options: string
|
Label Image |
Image for the label instead of text Options: image |
Label Background |
Background image for the label Options: image |
Custom Class |
Custom css classes if you want to make own style for label Options: string |
Custom CSS |
This option allows you input css styles directly to make style for label Options: string |
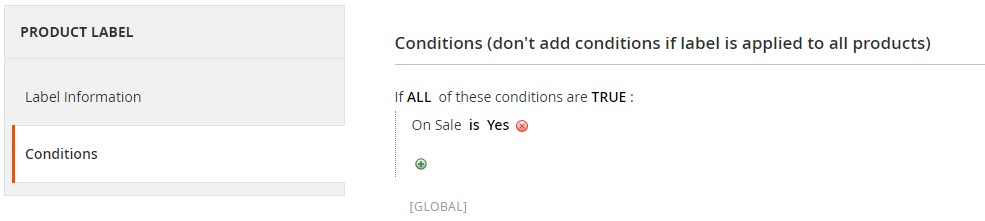
CONDITIONS
1. EDIT AMP HOME PAGE
- Go to backend menu Content > Elements > Pages.
- Select your home page.
- Edit the field AMP Content. Please make sure your HTML tags are valid with AMP rule. If this field is empty, the value of "Content" field will be used for AMP version of this page with a HTML filter.
In this field, you can use Softprodigy AMP Products List to insert product grid/list/slider.
2. EDIT AMP CMS PAGE
- Go to backend menu Content > Elements > Pages.
- Select the page you want to edit.
- Edit the field AMP Content. Please make sure your HTML tags are valid with AMP rule. If this field is empty, the value of "Content" field will be used for AMP version of this page with a HTML filter.
In this field, you can use Softprodigy AMP Products List to insert product grid/list/slider.
3. MODIFY COLORS / FONTS / LOGO / HEADER / FOOTER / IMAGE SIZES
Go to backend menu Softprodigy > Google AMP > Settings
MODULE CONFIGURATION
You can configure all options of Social Login module in System Configuration Panel.
From Magento Admin, select
Store > Settings > Configuration > Mageplaza Extensions > Social Login.
I. General
From the Admin Panel, go to
Store > Settings > Configuration > Mageplaza Extensions > Social Login, choose General
sections
- In the Enable field: Select “Yes” to allow customers sign in quickly via social networking sites they are using.
- In the Send Password To Customer field: Select “Yes” to activate sending notifications to customers to remind them to change their passwords when signing in via social accounts. They can change their passwords via their emails used to register for that social account.
-
In the Show Social Login Buttons on field:
- Select display page(s) with social login buttons. Show Social Login Buttons on = Customer Login Page will show social login buttons on the login page.
- Can select more than one option
-
In the Use Popup Login field: Select “Yes” to
- Turn on Popup and Show Social Login Buttons in Login Dialog, Create New Account, and Forgot Passwords.
- Include Social Login buttons in Customer Authentication Popup page
- In the Popup Links Selector field: Customize any default Login and Create button to be a popup-open button by filling in class name of elements that cover these buttons.
- In the Require Real Email field: Choose Yes to enable the real email confirmation feature with the social media that doesn’t provide a real email as Yahoo, Github, etc.
- Popup Effect : Admin can select one among popup display effects below
- In the Style Management field: Admin can choose one of the display colors for popup. Style Management = Custom means Admin can select custom the color swatch.
- In the Custom CSS field: You can add CSS code to customize based on your personal preference.
II. FACEBOOK SIGN IN
2.1. How to configure Facebook
Go to Store > Settings > Configuration > Mageplaza Extensions > Social Login > Facebook.
- In the Enable field: Select “Yes” to show Sign in with Facebook button
- In the Sort Order field: The order to show social login buttons. Order will be arranged as following: number, special symbol, uppercase, lowercase.
- Instruction to create Facebook API can be found here.
2.2. Login using Facebook
Facebook Login dialog will be shown after clicking on Sign in with Facebook button.
III. GOOGLE SIGN IN
3.1. How to configure Google
Go to Store > Settings > Configuration > Mageplaza Extensions > Social Login > Google.
- In the Enable field: Select “Yes” to show Sign in with Google button
- In the Sort Order field: The order to show social login buttons. Order will be arranged as following: number, special symbol, uppercase, lowercase.
- Instruction to create Google API can be found here.
3.2. Login using Google
Google Login dialog will be shown after clicking on Sign in with Google button
IV. AMAZON SIGN IN
4.1. How to configure Amazon
Go to Store > Settings > Configuration > Mageplaza Extensions > Social Login > Amazon.
- In the Enable field: Select “Yes” to show Sign in with Amazon button
- In the Sort Order field: The order to show social login buttons. Order will be arranged as following: number, special symbol, uppercase, lowercase.
4.2. Login using Amazon
Amazon Login dialog will be shown after clicking on Sign in with Amazon button.
V. TWITTER SIGN IN
5.1. How to configure Twitter
Go to Store > Settings > Configuration > Mageplaza Extensions > Social Login > Twitter.
- In the Enable field: Select “Yes” to show Sign in with Twitter button
- In the Sort Order field: The order to show social login buttons. Order will be arranged as following: number, special symbol, uppercase, lowercase.
- Instruction to create Twitter API can be found here.
5.2. Login using Twitter
Twitter Login dialog will be shown after clicking on Sign in with Twitter button.
VI. LINKEDIN SIGN IN
6.1. How to configure LinkedIn
Go to Store > Settings > Configuration > Mageplaza Extensions > Social Login > Linkedln
- In the Enable field: Select “Yes” to show Sign in with LinkedIn button
- In the Sort Order field: The order to show social login buttons. Order will be arranged as following: number, special symbol, uppercase, lowercase.
- Instruction to create LinkedIn API can be found here.
6.2. Login using LinkedIn
LinkedIn Login dialog will be shown after clicking on Sign in with LinkedIn button.
VII. YAHOO SIGN IN
7.1. How to configure Yahoo
Go to Store > Settings > Configuration > Mageplaza Extensions > Social Login > Yahoo.
- In the Enable field: Select “Yes” to show Sign in with Yahoo button
- In the Sort Order field: The order to show social login buttons. Order will be arranged as following: number, special symbol, uppercase, lowercase.
- Instruction to create Yahoo API can be found here.
7.2. Login using Yahoo
Yahoo Login dialog will be shown after clicking on Sign in with Yahoo button.
VIII. FOURSQUARE SIGN IN
8.1. How to configure Foursquare
Go to Store > Settings > Configuration > Mageplaza Extensions > Social Login > Foursquare.
- In the Enable field: Select “Yes” to show Sign in with Foursquare button
- In the Sort Order field: The order to show social login buttons. Order will be arranged as following: number, special symbol, uppercase, lowercase.
- Instruction to create Foursquare API can be found here.
8.2. Login using Foursquare
Foursquare Login dialog will be shown after clicking on Sign in with Foursquare button.
IX. INSTAGRAM SIGN IN
9.1. How to configure Instagram
Go to Store > Settings > Configuration > Mageplaza Extensions > Social Login > Instagram.
- In the Enable field: Select “Yes” to show Sign in with Instagram button
- In the Sort Order field: The order to show social login buttons. Order will be arranged as following: number, special symbol, uppercase, lowercase.
- Instruction to create Instagram API can be found here.
9.2. Login using Instagram
Instagram Login dialog will be shown after clicking on Sign in with Instagram button.
X. VKONTAKTE SIGN IN
10.1. How to configure Vkontakte
Go to Store > Settings > Configuration > Mageplaza Extensions > Social Login > Vkontakte.
- In the Enable field: Select “Yes” to show Sign in with Vkontakte button
- In the Sort Order field: The order to show social login buttons. Order will be arranged as following: number, special symbol, uppercase, lowercase.
- Instruction to create Vkontakte API can be found here.
10.2. Login using Vkontakte
Vkontakte Login dialog will be shown after clicking on Sign in with Vkontakte button.
XI. GITHUB SIGN IN
11.1. How to configure Github
Go to Store > Settings > Configuration > Mageplaza Extensions > Social Login > Github.
- In the Enable field: Select “Yes” to show Sign in with Github button
- In the Sort Order field: The order to show social login buttons. Order will be arranged as following: number, special symbol, uppercase, lowercase.
- Instruction to create Github API can be found here.
11.2. Login using Github
To enable/disable this feature or change its options, you can go to menu Catalog > Shipping Estimation > Settings.
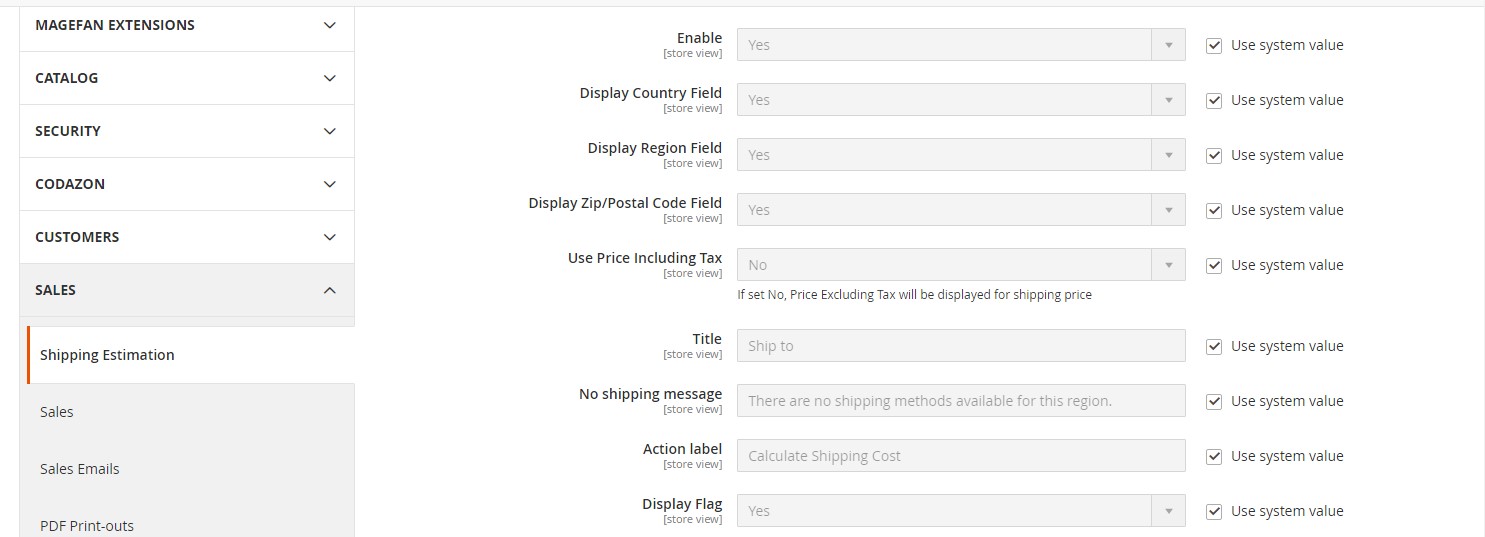
CONFIGURATION
Go to menu Softprodigy > Flexible Theme > Settings. Hover on your current theme and click button Config
From Theme settings panel, go to section Pages > Product View
Set Yes for the field Display Size Chart

1. If your size chart is a page
Size Chart Type = Link to a CMS page.
Then write the URL of the page you will use into the field Size Chart Page Link
2. If your size chart has a same content for all products
Size Chart Type = Popup - content is a CMS block.
Then select the block you will use with options in the field Size Chart Popup
3. If your size chart has different content for each products
You can use a product attribute (Catalog Input Type for Store Owner = Text Area) for size chart content.
Size Chart Type = Popup - content is a product attribute value.
Then write the code of the attribute you will use into the field Size Chart Attribute
4. If your size chart content depends to product attribute set
Size Chart Type = Popup - content depends to product attribute set.
Then write the mapping into the field Size Chart Attribute Set Mappings
Use syntax below:
    attribute set 1 name>:CMS block 1 identifier
        attribute set 2 name>:CMS block 2 identifier
(Break line to add new mapping). E.g.:
Default:codazon-sizechart-default
Women Clothing:codazon-sizechart-women-clothing
Note: Empty Size Chart Link Label field below to use the cms block name as link label.
SETTINGS
Go to menu Catalog > Ajax Layered Navigation Pro > Settings.
From the tab Softprodigy > Ajax Layered Navigation, set Yes for the field General > Enable product listing infinite scroll.
FRONTEND
BACKEND
Go to menu Softprodigy > Flexible Theme > Main Content. Select your main content and go to its edit page.
Use Container element to make a section. If you want to display its reference link on the floating bar, you can use the options below (click image to view full):
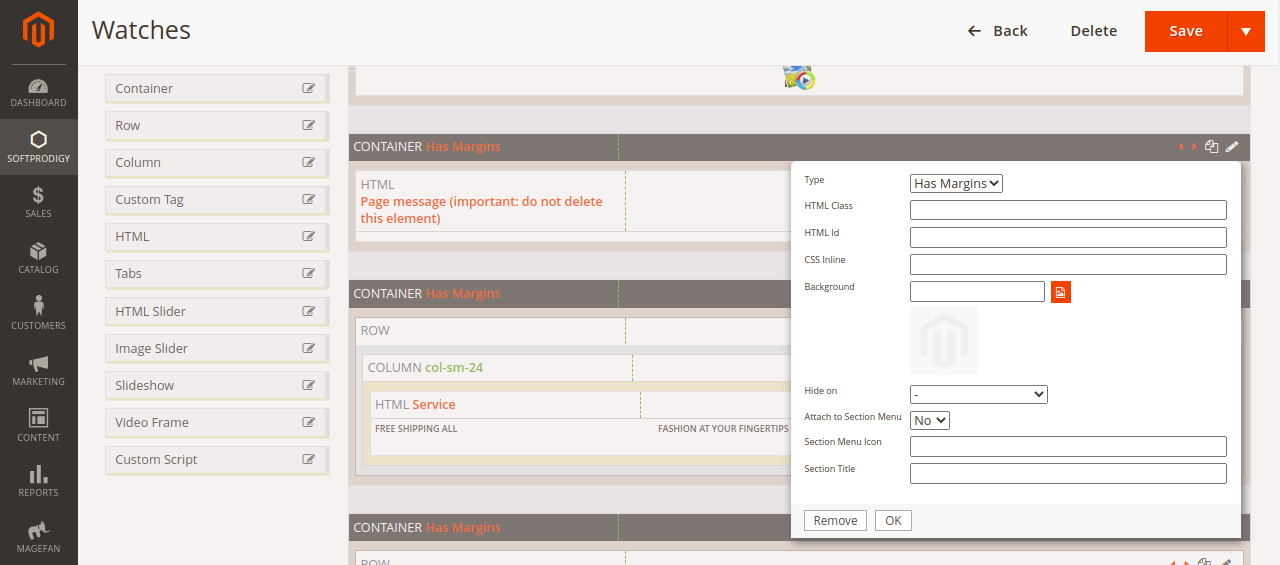
Get icon code here
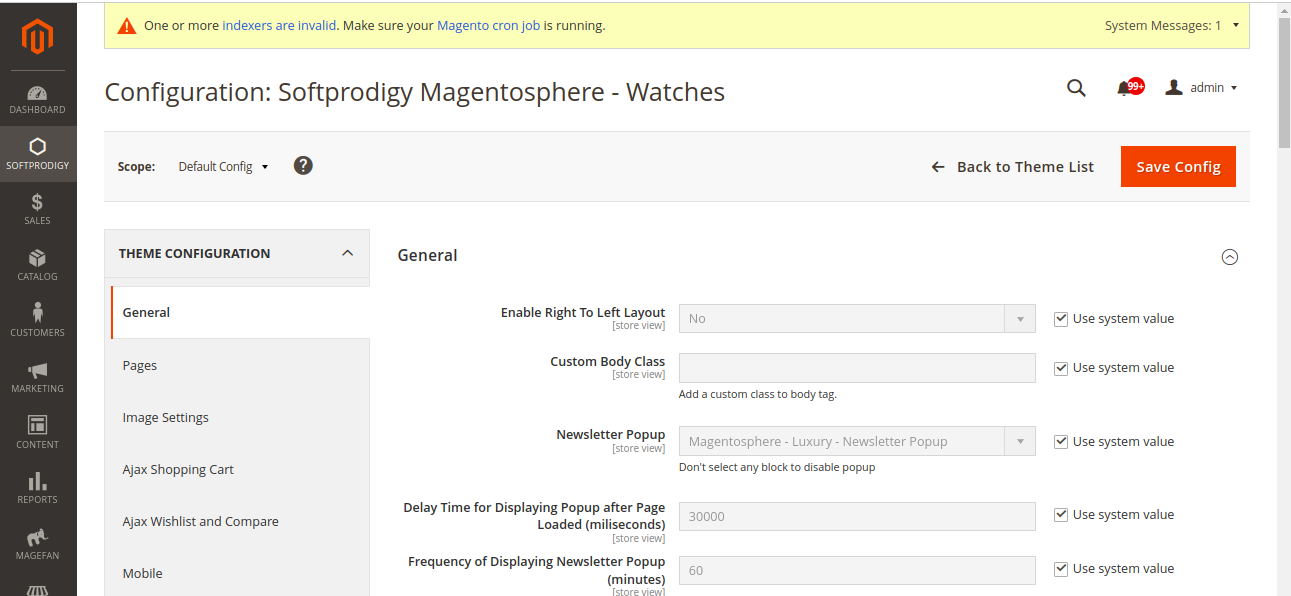
1. SETTINGS
Go to backend menu Softprodigy > Flexible Theme > Settings
Hover on your current theme and click button Config
The options of Newsletter Popup are in the screenshot below (click image to view full):
2. EDIT NEWSLETTER POPUP CONTENT
Go to backend menu Content > Elements > Blocks
Select the block which you choose for Newsletter Popup field (view section 1. Settings) and edit its content.
Our page builder, header builder, footer puilder support lazyload.
To use lazyload for images on home page, you can use the html class cdz-lazy
<img class="cdz-lazy" src="<img src>" width="<img width>" height="<img height>" >
E.g.
<img class="img-responsive cdz-lazy" src="https://softprodigy.in/media/wysiwyg/softprodigy/main-content-12/img-04.jpg" width="1420" height="400" >
Frontend output will be:
<img class="img-responsive cdz-lazy" src="data:image/png;base64,iVBORw0KGgoAAAANSUhEUgAAAAEAAAABCAQAAAC1HAwCAAAAC0lEQVR42mP8Xw8AAoMBgDTD2qgAAAAASUVORK5CYII=" data-lazysrc="https://magentosphere-watch-theme.softprodigy.in/magentosphere/pub/media/wysiwyg/softprodigy/main-content-12/img-04.jpg" width="1420" height="400">
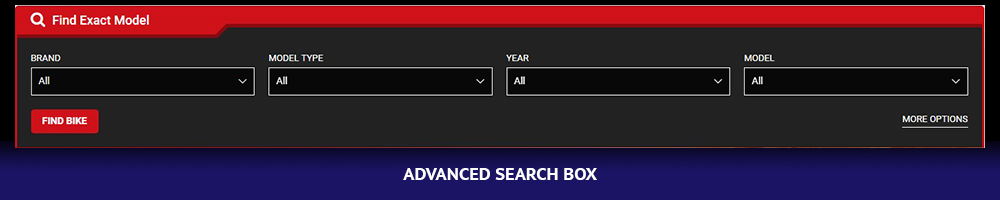
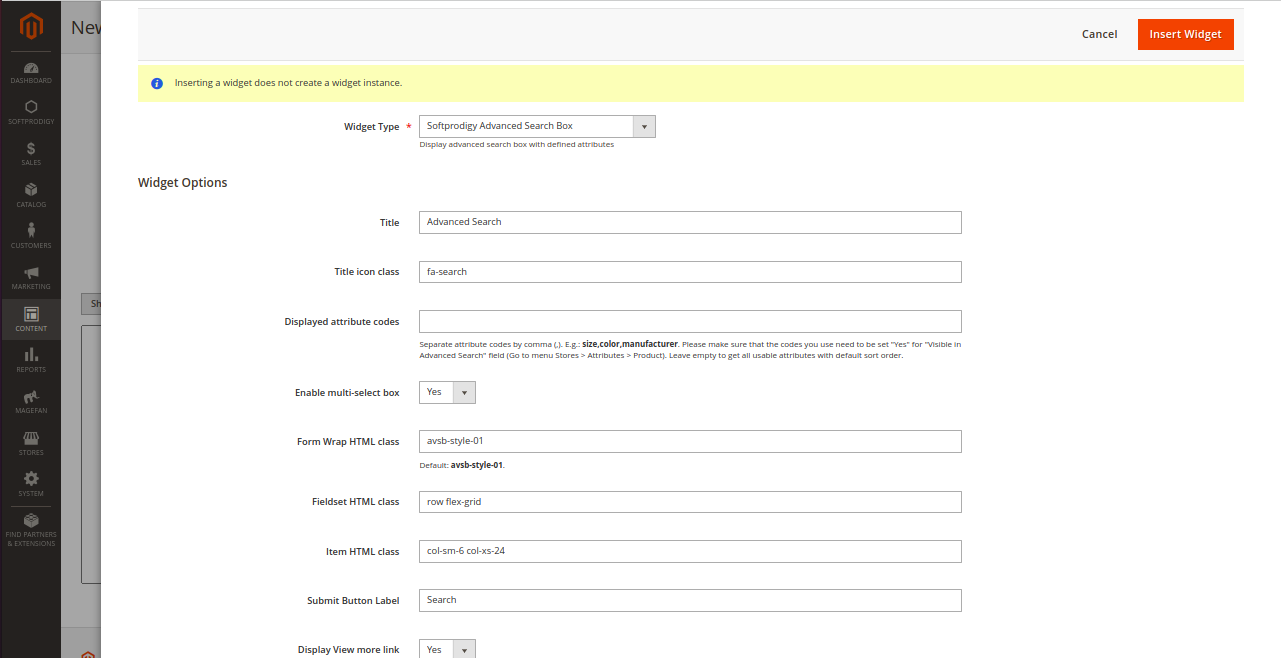
With Softprodigy Advanced Search Box Widget, you can display the Advanced Search Form on any page you want such as home page, cms page, product page...
FRONTEND
BACKEND
Go to menu Content > Design > Configuration.
Select the default store or current store and click Edit.
Go to field Other Settings > Header > Logo Image and upload your logo.
Go to menu Softprodigy > Flexible Theme > Main content.
Go to your current main content edit page
- Add your custom CSS code to the field Font/Color Variables > Extra Customization > Custom CSS Code
- Add your custom LESS code to the field Font/Color Variables > Extra Customization > Custom LESS Code

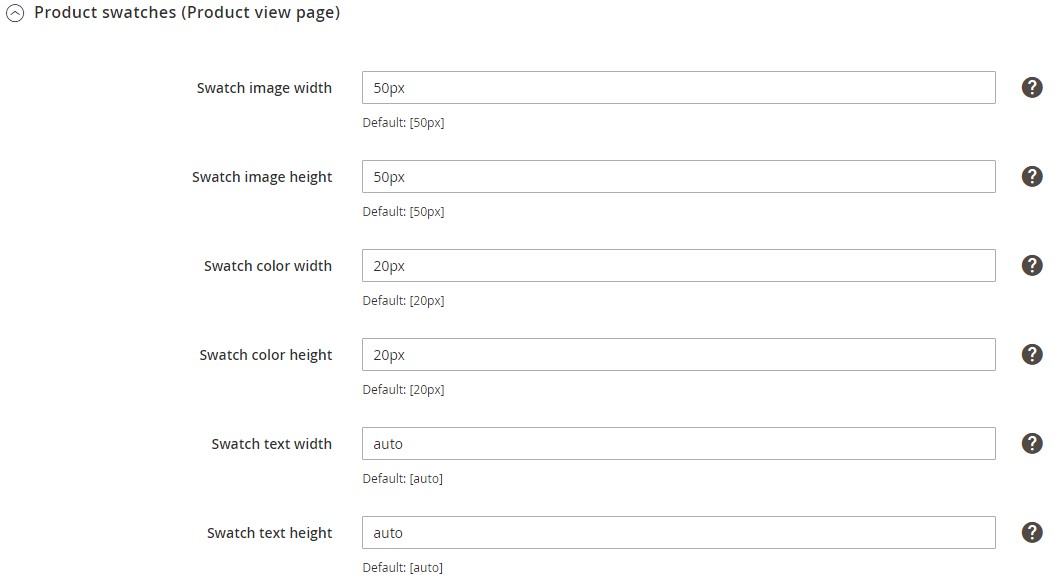
1. CHANGE WITH AND HEIGHT OF SWATCH BUTTONS (CSS)
Go to menu Softprodigy > Flexible Theme > Main Content.
Select your current used main content.
Go to section Font/Color Variables > Product swatches (Product view page). Edit value for swatch size fields.
CHANGE WITH AND HEIGHT OF SWATCH IMAGES
If you use swatch images, you need to change the default sizes of swatch images following
- Copy the file:
vendor/magento/module-swatches/etc/view.xml
to (create necessary directories if not exist):
app/design/frontend/Softprodigy/magentosphere/default/Magento_Swatches/etc/view.xml
- Change the height and width values in the new file with the appropriate height and width values
- Go to Magento Backend menu System > Tools > Cache Management and refresh Magento cache.
- Continue to click button Flush Catalog Images Cache.
Go to menu Content > Design > Configuration.
Select the default store or current store and click Edit.
Go to field Other Settings > HTML Head > Scripts and Style Sheets and insert your custom script:

Then refresh Magento cache.
Go to menu Content > Design > Configuration.
Select the default store or current store and click Edit.
Go to field Other Settings > Footer > Miscellaneous HTML and insert your custom script:

Then refresh Magento cache.

Go to directory
app/design/frontend/Softprodigy/magentosphere/default/web/images/flags/
Add your custom store flag with name:
flag_<store view code>.gif
Access to your website and check language switcher. If the flag is still not displayed on the language switcher, please run command setup:static-content:deploy.
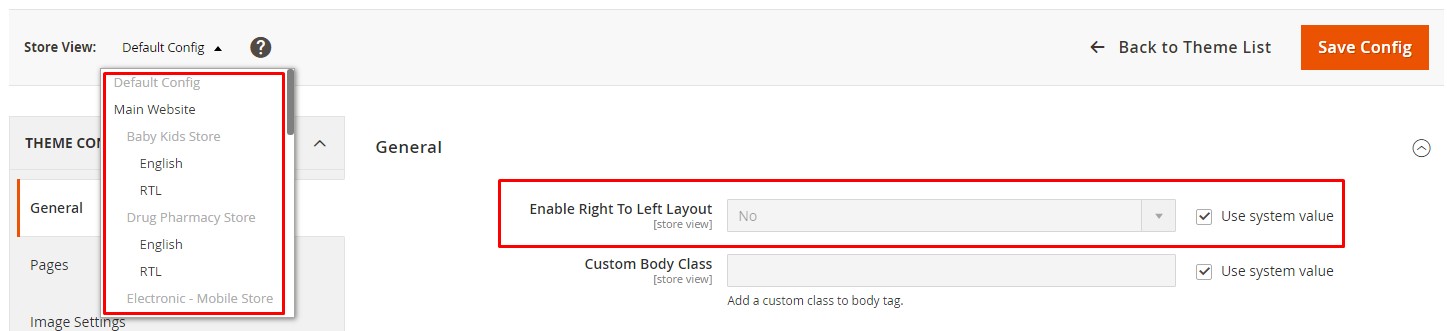
To enable RTL view, you can go to menu Softprodigy > Flexible Theme > Settings.
Hover on your current theme and click "Config" button to go settings panel.
In the tab General, you can enable RTL view with the field "General > Enable Right To Left Layout". Then click button Save Config and clear Magento cache.
TIP: If you want to enable RTL view for a store, you can use Store switcher to change the store before change the setting.
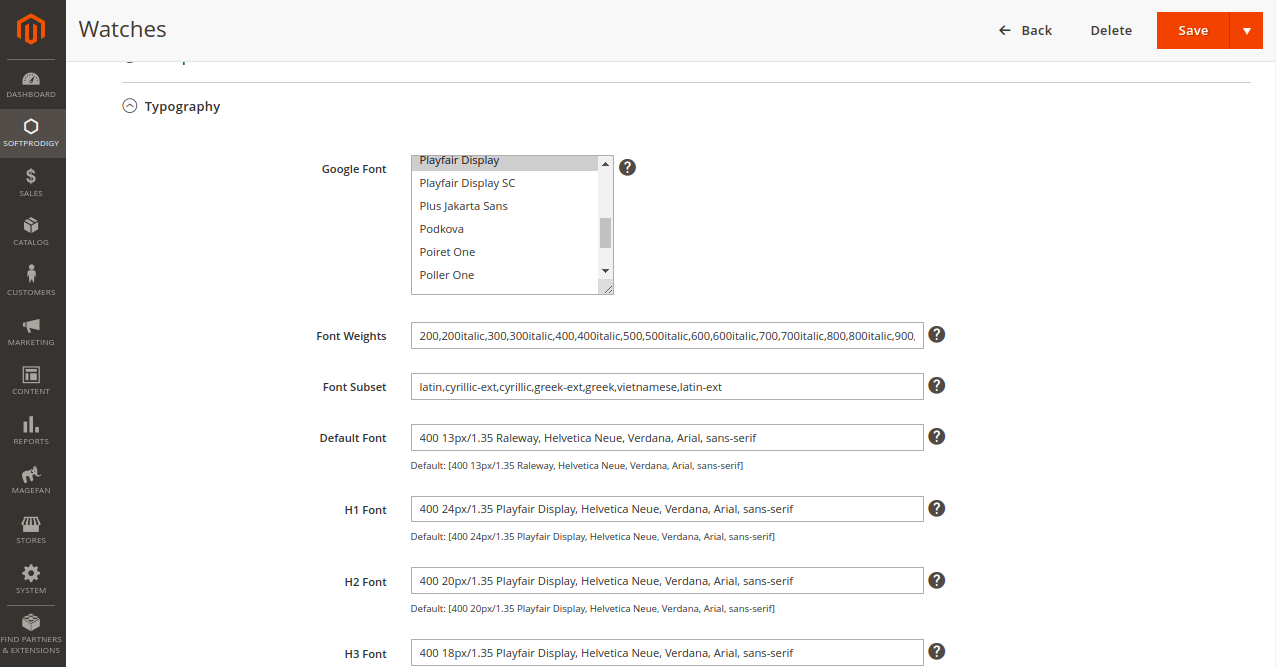
Go to menu Softprodigy > Flexible Theme > Main Content.
Select and go to your current main content edit page.
In the section Font/Color Variables > Typography, you can change the fonts as screenshot below.
1. CHANGE HEADER COLORS
Go to menu Softprodigy > Flexible Theme > Header.
Select and go to your current header edit page.
You can change the colors the section Font/Color Variables
2. CHANGE MAIN CONTENT COLORS (THEME COLORS)
Go to menu Softprodigy > Flexible Theme > Main Content.
Select and go to your current main content edit page.
You can change the colors the section Font/Color Variables
3. CHANGE FOOTER COLORS
Go to menu Softprodigy > Flexible Theme > Footer.
Select and go to your current footer edit page.
You can change the colors the section Font/Color Variables
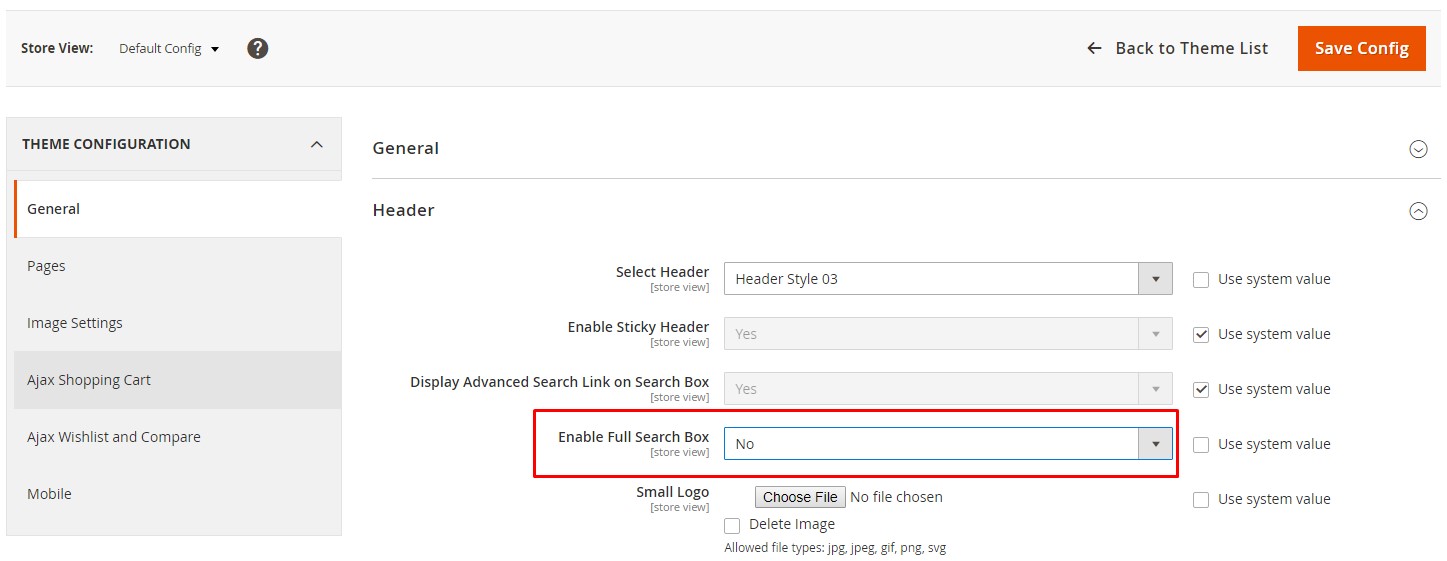
Go to menu Softprodigy > Flexible Theme > Settings.
Select your current theme.
Set No for General > Header > Enable Full Search Box.
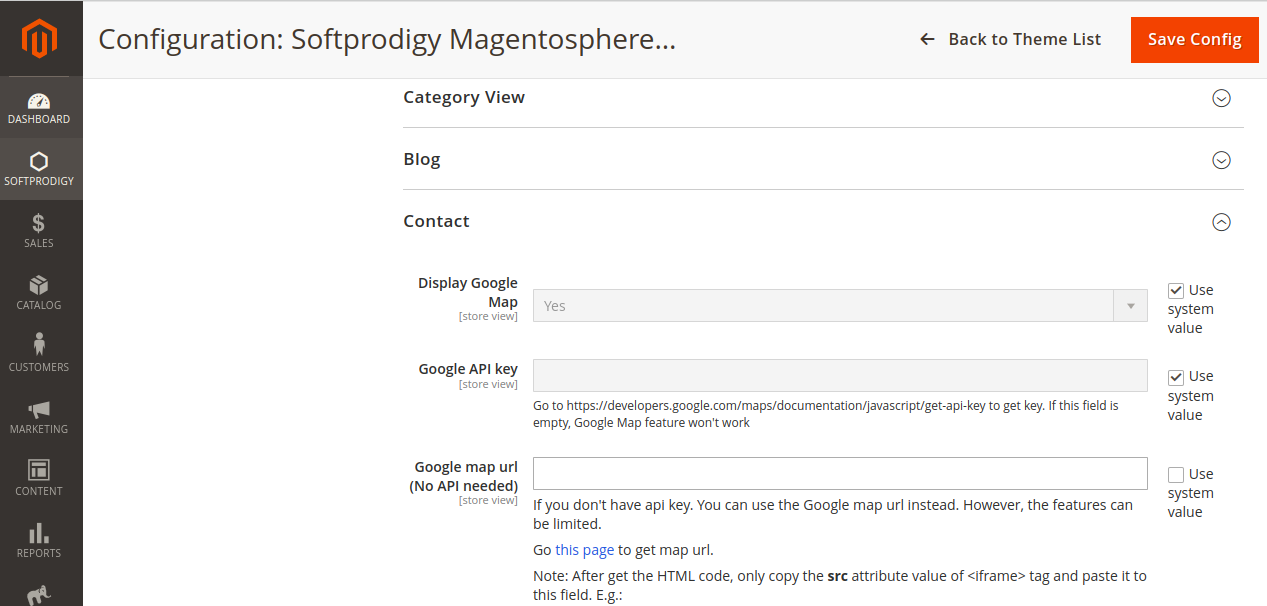
Go to menu Softprodigy > Flexible Theme > Settings.
Select your current theme.
Configure Google Map in section Pages > Contact.
Clone the file:
vendor/magento/module-contact/view/frontend/templates/form.phtml
to
app/design/frontend/Softprodigy/magentosphere/<your current theme>/Magento_Contact/templates/form.phtml
and edit the new file.
Go to menu Softprodigy > Flexible Theme > Settings. Click button Config on your current theme.
In settings page, edit the field Pages > Product View > Maximum Height of Details Tab. Then click button Save Config and clear Magento cache.
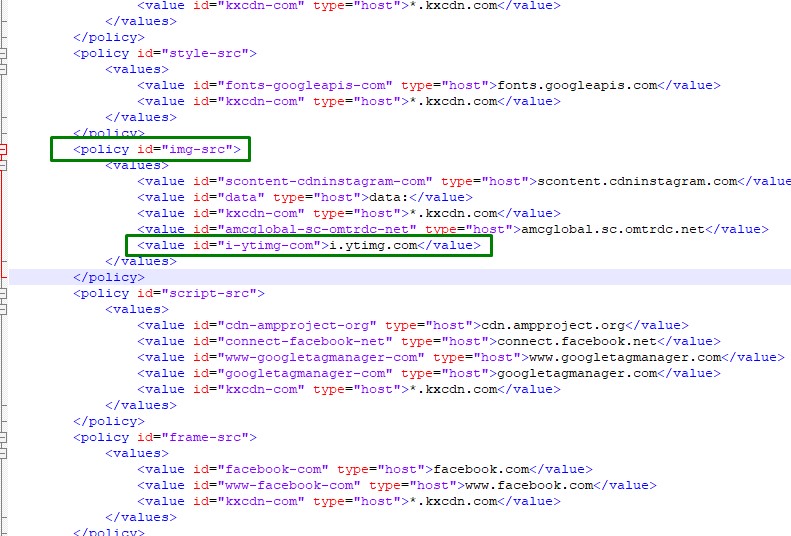
Rename the file
app/code/Softprodigy/ThemeLayoutPro/etc/csp_whitelist.xml.sample
to
app/code/Softprodigy/ThemeLayoutPro/etc/csp_whitelist.xml
and add the media source host into the whitelist according the media type (script, style, frame,...). Then clear Magento cache.
Notice: If you don't see this file, please upgrade the theme to the newest version Click here
E.g.:

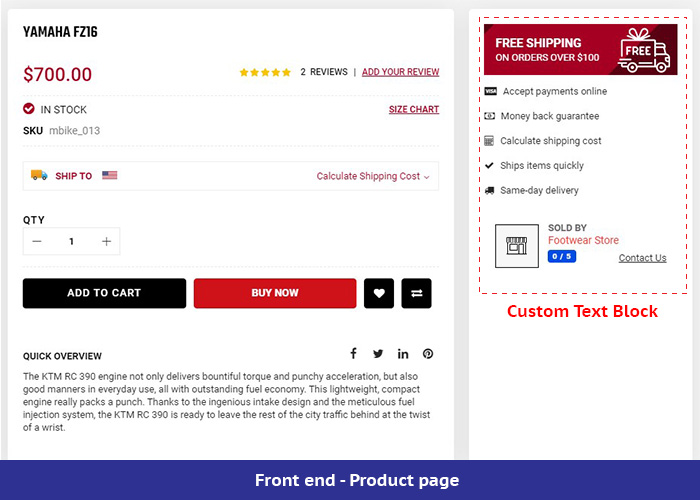
Go to menu Softprodigy > Flexible Theme > Settings. Hover on your current theme and click button Config.
The content of this block is specified by the field Pages > Product View > Custom Text. This is a CMS block.
To edit the content of this block, go to menu Content > Elements > Blocks. Choose the block which you selected in the field Custom Text and edit its content. Then clear Magento cache.
Frontend
Backend

Go to menu Stores > Settings > Configuration. View the field Web > Default Pages > CMS Home Page to know the current page used for home page.
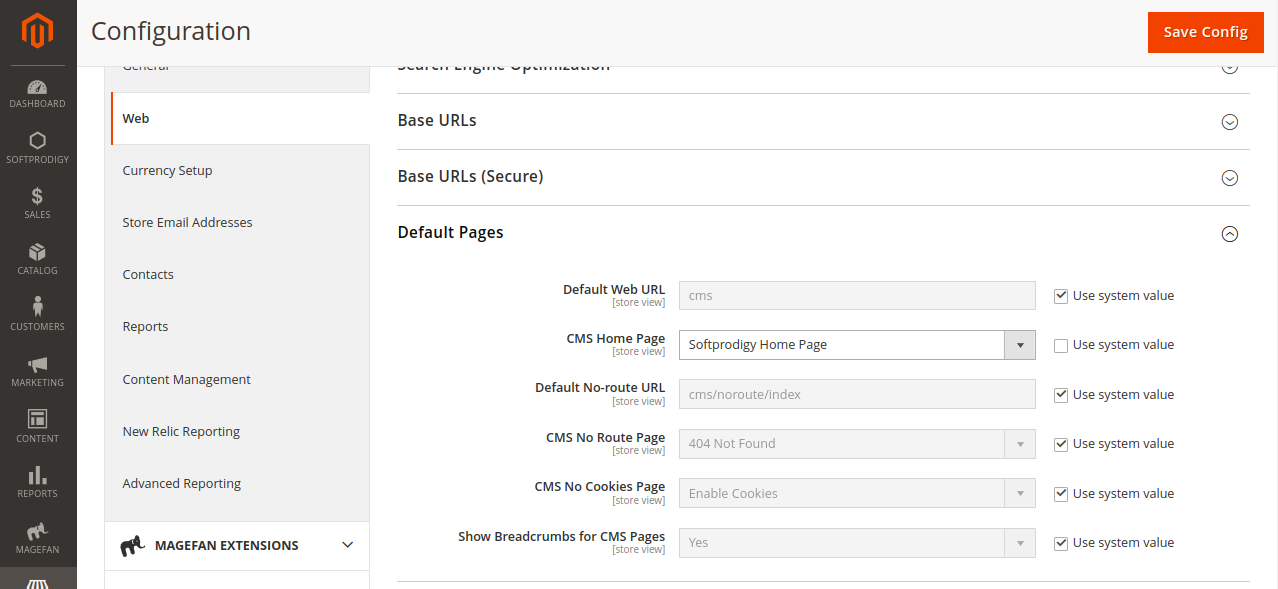
Go to menu Content > Elements > Pages. Select the page used for home page and edit its title.

Go to menu Content > Elements > Pages. Select the page with title "Softprodigy Home Page" and edit its title.
Go to menu Softprodigy > Flexible Theme > Settings. Hover on your active theme and click button Config.
Edit the value of the field Pages > Home page > Custom script in head tags.
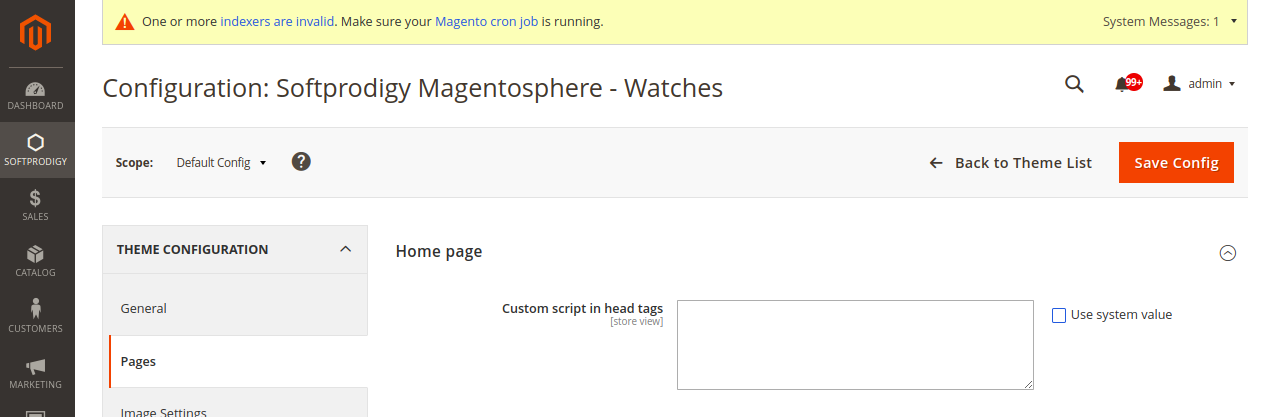
Then clear Magento cache.
After that, continue to clear the Facebook cache via https://developers.facebook.com/tools/debug/